Introduction - Scratch Screen
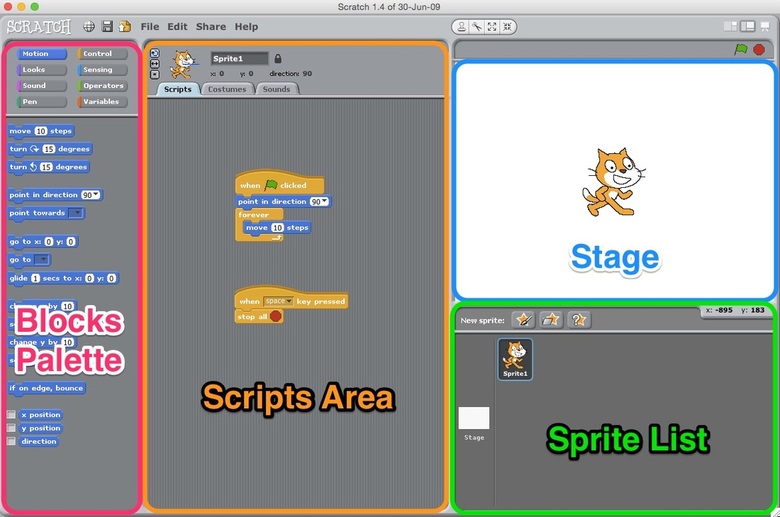
This is your Scratch screen. It is divided into 4 major parts: the blocks palette, the scripts area, the stage, and the sprite list.
The Block Palette is the area in the middle-top hand side of the Scratch program where blocks can be dragged from. These blocks fall under the following categories: Motion, Looks, Sound, Pen, Data, Events, Control, Sensing, Operators, and More Blocks.
The Scripts Area is the area on the right side of the Blocks Palette where scripts are assembled. Scripts are instructions that tell the sprite to do something like move certain number of steps and changing direction. The instructions take the form of blocks that are interlocked with one another. When the instructions are performed, they are performed in the order they were stacked.
The Stage is the background of the project. It can also be changed by adding scripts/instructions. It is always behind the sprites. Some blocks can not be used like motion and size.
The Sprite List is where you can add sprites by either creating from scratch or by importing from the Scratch Library. You can also edit the sprite you added in the costumes tab.
Taskcard 1 - Movement, Looping (repeat/forever) and Bouncing on the Edge
For this lesson, we will be learning how to move the sprite on the stage. Do the following tasks:
TASK 1: Watch the video
TASK 1: Watch the video
TASK 2: Open the file follow the instructions carefully. Click here (a new tab will open)
Taskcard 2 - Change Effects (colour, etc), Press key and Wait sec.
TASK 1: Watch the video
TASK 2: Open the file follow the instructions carefully. Click here (a new tab will open)
Taskcard 3 - Importing New Sprites and Speaking/Thinking
TASK 1: Watch the video
TASK 2: Open the file follow the instructions carefully. Click here (a new tab will open)
Taskcard 4 - Create Your Own Animation Using Costumes
TASK 1: Watch the video
TASK 2: Open the file follow the instructions carefully. Click here (a new tab will open)
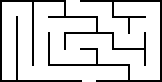
PROJECT 1 - Version 1 - Maze
Step 1: Drag the mouse sprite and the maze stage on your desktop

|
|
Step 2: Read the instructions below carefully
PROJECT 1 - Version 2 - Maze
Step 1: Drag the cheese sprite on your desktop

Step 2: Read the instructions below carefully
Finished Project Here
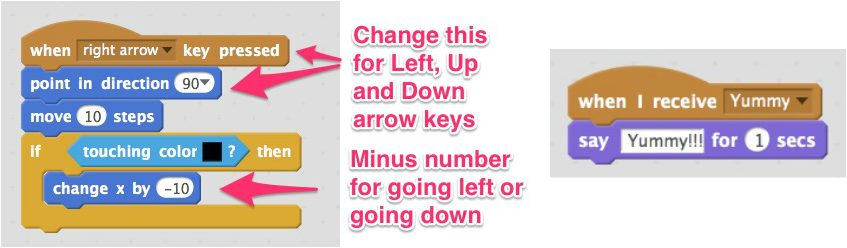
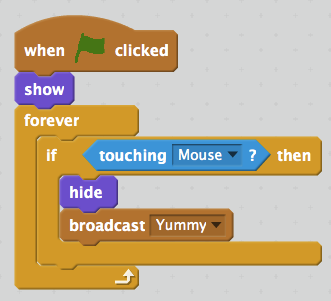
Code for the mouse